Unlike the old style of cafe barriers with a rail system, we have created a double sided lightweight polyester sock.
This sock slips over the cafe barrier frame and is held in place with zip ties along the bottom.
Once tightened up the zip ties are not visible resulting in a drum tight finish. This sock can easily be taken on and off by following these simple steps.

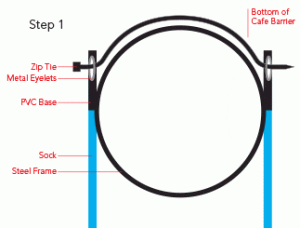
STEP 1 – INSERTING THE ZIP TIE CORRECTLY.
Remove your old cafe barrier sock by cutting the existing zip ties and sliding the sock off the frame. Replace your branding message by slipping the new sock over the frame. Turn your Cafe Barrier upside-down, resting it gently on the top bar. It is best to have a towel on the ground to avoid scratching the new sock or the frame.
Facing your Cafe Barrier, begin inserting your first zip tie. Thread the zip tie through the first metal eyelet and OVER the frame and through the metal eyelet on its opposite side. Pull it through until the square end butts up against the first eyelet.
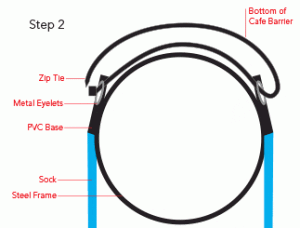
 STEP 2 – PULLING THE ZIP TIE TIGHT
(See image on right).
Once your zip tie is threaded through the two metal eyelets, pull the zip tie forward, up and back over towards yourself pulling as hard as you can to ensure the zip tie is as far through as it can be.
Resting your free hand onto the frame for support is recommended.
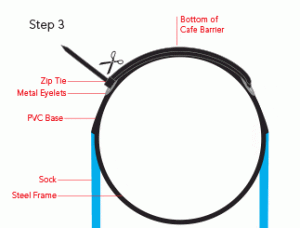
 STEP 3 – PULLING THE SOCK TIGHT
Insert the end of the zip tie into the square end fastening clip.
Pull through cranking over each tooth of the zip tie until the sock fabric is drum tight and the zip tie is as tight as it can be.
Using scissors or a pair of pliers cut the additional length of the zip tie that is no longer necessary. Be sure to cut as low as possible to ensure no injury is caused from a sharp zip tie end poking out.
STEP 3 – FINISHING UP
Continue steps 1-3 along the cafe barrier on each of the metal eyelets parings. Once complete turn the cafe barrier back over. If you have removed the feet remember to tighten the thumbscrew when putting these back
